Soundproofing the trunk of a car is a key part of improving driving comfort. The trunk is often a source of unpleasant sounds that disrupt the peace and quiet of your trip. Noise coming from the rear of the vehicle can come from a variety of sources – from the sound of the road and tires, to the vibration of body components, to the sound of the exhaust system. Effective soundproofing of the trunk not only reduces the noise level in the passenger compartment, but also improves the sound quality of the audio system.
The process of soundproofing the trunk involves several steps, from the selection of suitable insulation materials, to surface preparation and proper installation. The use of specialized butyl mats and rubber foams makes it possible to significantly reduce vibrations and oscillations, resulting in a quieter ride. These materials often also provide thermal insulation, protecting the interior of the vehicle from excessive heating in summer and cooling in winter.
Properly performed trunk soundproofing requires accuracy and patience, but the results are well worth the effort. The noise reduction can be felt immediately after the work is completed. It is especially important to thoroughly cover all metal surfaces of the trunk, especially around the wheel arches, where the greatest vibrations are generated. Professional soundproofing materials are characterized by high adhesion, flexibility and weather resistance, ensuring long-term effectiveness.
Why you should soundproof the trunk of your car
Soundproofing the trunk of a car brings numerous benefits that significantly affect driving comfort and the overall experience of the vehicle. Noise reduction is the first and most obvious effect of properly executed soundproofing. The trunk, as a space directly exposed to outside sounds, is often a “gateway” to unwanted road, tire or exhaust noises.
Improving acoustic comfort
Effective soundproofing of the trunk significantly reduces the level of noise reaching the passenger compartment. This makes conversations between passengers more comfortable and listening to music or audiobooks more enjoyable. This is especially noticeable when driving on uneven surfaces or paving stones, where vibrations and clatter are most intense.
Soundproofing the trunk also affects the sound quality of the audio system. Eliminating unwanted vibrations and resonances allows for a clearer reception of music, especially low tones. This is especially important for those who have invested in a high-quality audio system or subwoofer.
The best soundproofing results are achieved when the trunk is the first stage of a comprehensive soundproofing of the entire car, including the floor, doors and roof.
Protection against vibrations and resonances
The trunk, due to its design and location, is particularly vulnerable to vibration. Metal body parts tend to resonate, which further amplifies unwanted sounds. The use of soundproofing materials effectively dampens these vibrations, preventing their transmission to other parts of the vehicle.
Soundproofing the trunk also has a positive effect on the durability of the equipment components. Less vibration means less strain on fasteners, hinges and other structural components, which can extend their life.
Thermal insulation as an added benefit
Materials used to soundproof a trunk often also have thermal insulation properties. This helps protect the trunk from extreme temperatures, which is important in both summer and winter. Transported items are less likely to overheat or freeze, which is important when transporting temperature-sensitive products.
The additional thermal insulation also affects the efficiency of the car’s air conditioning and heating. The passenger compartment reaches the desired temperature faster, and the air conditioning system works less intensively, which can translate into lower fuel consumption.
Choosing the right insulation materials for the trunk
Effective soundproofing of the trunk requires the use of suitable insulating materials that are tailored to the specifics of this area of the car. There are various types of products available on the market, which differ in properties, thickness and purpose.
Butyl mats – the basis of soundproofing
Butyl mats are the basic material used for soundproofing the trunk. They consist of a layer of butyl, which is characterized by high density and elasticity, which translates into effective damping of vibrations and oscillations. These mats most often have a self-adhesive layer, which facilitates installation on the metal surfaces of the trunk.
The thickness of butyl mats is important for their effectiveness. Standard mats are 1.5 to 3 mm thick, but for a trunk that is particularly prone to vibration, mats with a minimum thickness of 2 mm are recommended. The greater thickness provides better sound attenuation, especially of low-frequency sounds.
Butyl mats are resistant to high temperatures, which is important for a trunk where temperatures can rise significantly, especially in summer. Good-quality mats retain their properties at temperatures up to 100°C, which ensures their long-term effectiveness.
Rubber and polyurethane foams
Rubber and polyurethane foams complement butyl mats, forming an additional insulating layer. These materials are characterized by an open cell structure that effectively absorbs sounds, especially those of medium and high frequencies.
Rubber foams are particularly valued because of:
- High flexibility, which allows them to conform to irregular surfaces
- Resistance to moisture and mold
- Thermal insulation properties
- Long service life
The thickness of foams used in the trunk usually ranges from 5 to 20 mm. The choice of the appropriate thickness depends on the available space and the desired soundproofing effect. Note that a foam layer that is too thick can make it difficult to install the trunk trim later.
Tip: When choosing rubber foam, it is worth paying attention to its density – the higher it is, the better sound insulation, but at the expense of the material’s flexibility.
Aluminum mats and insulation foils
Aluminum mats and insulating foils act as a thermal barrier, reflecting heat and preventing it from penetrating into the trunk. These materials are particularly useful in cars where the trunk is close to the exhaust system or engine.
Aluminum foils often form the outer layer of composite mats, combining the properties of acoustic and thermal insulation. Such a solution allows comprehensive protection of the trunk from noise and overheating.
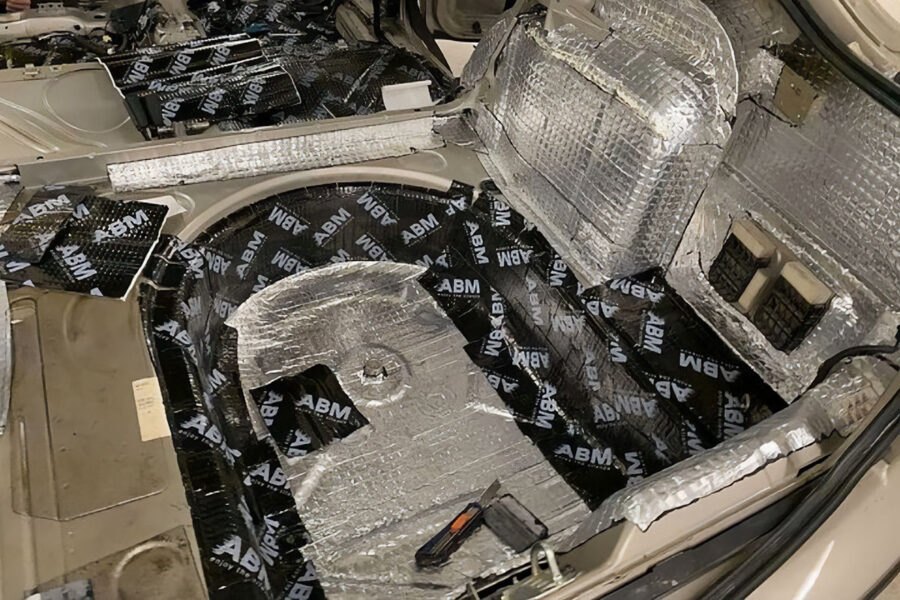
Materials for soundproofing the trunk of the car in the ABM store
ABM store offers a wide range of products for soundproofing the trunk of a car. The assortment includes both basic insulation materials and specialized solutions for more demanding applications.
ABM Professional and ABM Xtreme butyl mats
ABM Professional butyl mats are the basic material for soundproofing the trunk. They are characterized by high efficiency in damping vibrations and oscillations, resulting in significant noise reduction. They are available in different thicknesses, from 1.5 mm to 3 mm, allowing you to choose the right product depending on your needs.
ABM Xtreme butyl mats are the premium version of soundproofing mats. They are distinguished by increased density and better adhesion, resulting in even more effective vibration damping. They are especially recommended for luggage racks where vibration levels are high.
Key features of ABM butyl mats:
- High noise and vibration reduction
- Strong adhesive layer, eliminating the need for heating during installation
- Resistance to cracks, liquids and mold
- Certified quality confirmed by approvals
ABM butyl mats are available in both sheets and rolls, making it easy to fit different trunk surfaces. Prices start at £2.96 per sheet of ABM Professional butyl matting.
ABM insulating rubber foams
ABM rubber foams are an excellent complement to butyl mats, providing additional acoustic and thermal insulation. The store offers foams of various thicknesses, from 3 mm to 19 mm, which allows you to choose the right product depending on the available space in the trunk.
ABM rubber foams are characterized by high flexibility, which makes them easy to install on irregular trunk surfaces. Most products have a self-adhesive layer, which significantly simplifies the installation process.
For the trunk, rubber foams with a thickness of 6-10 mm are the best, which provide an optimal balance between insulation efficiency and ease of installation of trim.
A particularly interesting product is rubber foam with aluminum foil, which combines the properties of acoustic and thermal insulation. The aluminum foil reflects heat, which is particularly important in trunks exposed to high temperatures. Prices for ABM rubber foams start at $9.98 per 0.25 m² sheet.
Mounting accessories
ABM also offers the necessary accessories for the installation of soundproofing materials:
- Mounting rollers (polyurethane and metal) for accurate pressing of materials
- Rubber insulation tapes for sealing joints
- Kits for removing plastics in the car
- Upholstery knives for precise cutting of materials
- Extraction gasoline for degreasing surfaces
Comprehensive equipment with the right tools significantly facilitates the process of soundproofing the trunk and allows you to achieve professional results.
Preparation of the trunk surface before soundproofing
Proper preparation of the trunk surface is a key step in the soundproofing process, which significantly affects the effectiveness and durability of the entire installation. Neglecting this step can lead to poor adhesion of insulation materials, resulting in their falling off and loss of soundproofing properties.
Removal of trim pieces
The first step in preparing the trunk for soundproofing is to remove all trim. This includes the trunk liner, plastic covers, shelves and other accessories. Removal of these components provides access to the metal body, which will be covered with soundproofing materials.
Care should be taken during disassembly so as not to damage the plastic clips and mounts. It is advisable to use special tools for dismantling plastic components to minimize the risk of damage. Store all disassembled components in a safe place, away from dust and dirt.
For trunks with additional equipment, such as speakers, subwoofers or electrical system, it may be necessary to temporarily disconnect these components. Always disconnect the battery before disconnecting the electrical system to avoid a short circuit.
Cleaning and degreasing surfaces
After removing all trim components, the next step is to thoroughly clean the metal surfaces of the trunk.
The process includes:
- Removing loose dirt with a vacuum cleaner
- Washing the surface with water and detergent
- Thorough degreasing with extraction gasoline or a special degreasing agent
- Allowing the surface to dry completely
Degreasing is particularly important because even a small amount of grease or silicone can significantly reduce the adhesion of self-adhesive materials. It is worth spending more time on this step to ensure perfect cleanliness of the surface.
Tip: For degreasing, it is best to use clean cotton cloths that do not leave lint on the surface. Avoid paper towels, which can disintegrate during use.
Assessing surface condition and possible repairs
Before installing soundproofing materials, carefully assess the condition of the metal surfaces of the trunk.
Attention should be paid to:
- Traces of corrosion
- Cracks or deformation of the sheet metal
- Places where moisture collects
- The condition of welds and joints of body parts
If corrosion is detected, it should be removed with sandpaper or a wire brush, and then the exposed metal should be protected with a suitable anti-corrosion preparation. Minor dents or bumps are not a problem for flexible soundproofing materials, but larger deformations may require repair before soundproofing.
Special attention should be paid to areas where moisture can accumulate, such as cavities or drainage channels. These areas must be completely dry before applying soundproofing materials to prevent corrosion from developing under the insulation layer.
Steps for installing soundproofing mats in the trunk
Proper installation of soundproofing mats in the trunk requires a systematic approach and accuracy. The process can be divided into several key steps that will ensure optimal results and long-term effectiveness of soundproofing.
Planning the placement of materials
Before proceeding with the actual installation, plan the placement of the soundproofing mats. It is best to cover about 60-70% of the trunk’s metal surfaces with the material, concentrating on the large, flat areas that are most susceptible to vibration.
Special attention should be paid to the area around the wheel arches, which are the main source of noise from the wheels and suspension. Also, the trunk floor, which is exposed to exhaust system sounds, should be thoroughly covered with soundproofing material.
When planning the placement of the mats, it is a good idea to make templates from cardboard or paper for more complicated shapes. This will allow you to cut the material precisely and minimize waste.
Trimming and application of butyl mats
After planning the placement, the next step is to cut the butyl mats to the right dimensions. For this, it is best to use a sharp upholstery knife or scissors.
It is worth remembering to:
- Measure accurately before cutting
- Leave a small reserve of material (about 5 mm)
- Round the corners of the mats, which reduces the risk of them peeling off
- Cut holes for fasteners and structural components
Application of butyl mats begins with peeling off the protective layer from the adhesive. Apply the mat to the prepared surface, starting from one end and gradually pressing towards the other end. This approach minimizes the risk of air bubbles under the material.
Tip: If the temperature at the installation site is low, it is a good idea to slightly heat the butyl mat before application, such as with a hair dryer. This will increase the flexibility of the material and improve the adhesion of the adhesive.
Pressing and rolling the material
After applying the mat to the surface, the key step is to press it down thoroughly. This process, called rolling, ensures full adhesion of the material to the substrate and eliminates air bubbles that could reduce the effectiveness of the soundproofing.
It is best to use a special installation roller for rolling, which ensures even pressure across the entire surface of the mat. Rolling should be done from the center of the mat toward its edges, which helps push air out from under the material.
Special attention should be paid to the edges of the mats and the areas where individual sheets are joined. These areas are the most prone to peeling off, so they require careful pressing. In hard-to-reach areas, you can use a rounded tool, such as the handle of a wooden spoon or a rounded piece of plastic.
Once you’ve finished rolling, it’s a good idea to check that the mat adheres well to the substrate by gently pulling on its edges. If the material peels off easily, re-press the problem areas.
Additional layer of rubber foam for better insulation
The use of an additional layer of rubber foam significantly increases the effectiveness of soundproofing the trunk. While butyl mats effectively dampen vibrations, rubber foams perfectly absorb sound, creating a comprehensive soundproofing system.
Advantages of using rubber foam
Rubber foam offers a number of benefits that complement the properties of butyl mats. Excellent absorption of medium- and high-frequency sounds, which are not effectively attenuated by butyl mats. This makes the soundproofing system work over a wider frequency range.
Thermal insulation that protects the interior of the trunk from extreme temperatures. This is especially important for trunks subject to heat from the exhaust system or engine.
Flexibility and ability to conform to irregular surfaces. The rubber foam easily adheres to curved body parts, providing a continuous layer of insulation.
Resistance to moisture and mold for long-lasting soundproofing performance even in harsh conditions. High-quality rubber foams do not absorb water and do not provide a breeding ground for microorganisms.
Rubber foam application techniques
The installation of rubber foam follows the installation of butyl mats.
The process requires similar accuracy and a systematic approach:
- Accurately measuring and cutting the foam to size
- Removal of the protective layer of adhesive (in the case of self-adhesive foams)
- Applying the foam to the surface, starting from one end
- Gradually pressing the material, eliminating air bubbles
- Additional protection of the edges with rubber tape (optional)
For foams without a self-adhesive layer, it is necessary to use a suitable adhesive. Choose an adhesive designed for rubber materials, which remains elastic after drying and is resistant to high temperatures.
Tip: When installing rubber foam on vertical or ceiling surfaces, it is a good idea to additionally secure the material with upholstery staples or mounting pins, which will prevent it from falling off under the influence of gravity.
Optimal thickness and placement of the foam
Choosing the right thickness of rubber foam depends on several factors:
- Available space in the trunk
- The level of noise you want to reduce
- The budget allocated for soundproofing
For most trunk applications, a foam thickness of 6-10 mm is the optimal compromise between insulation effectiveness and ease of trim installation. In particularly noise-prone areas, such as around the wheel arches, thicker foam (10-20 mm) can be used.
The placement of the rubber foam should include:
- The trunk floor
- The inner surfaces of the wheel arches
- The rear wall of the trunk (especially for cars with a front engine)
- The side walls of the trunk
- The trunk lid (on the inside)
It is not necessary to cover 100% of the trunk area with foam. Focusing on the areas most exposed to noise will ensure an optimal cost/effect ratio.
The most common mistakes when soundproofing the trunk
The process of soundproofing a trunk, although seemingly simple, can be full of pitfalls for inexperienced people. Knowing the most common mistakes allows you to avoid them and achieve the intended soundproofing results.
Improper selection of materials
One of the most common mistakes is using inappropriate materials for soundproofing the trunk. Using butyl mats that are too thin and do not provide sufficient vibration damping. For a trunk that is particularly prone to vibration, use mats that are at least 2 mm thick.
Using low-quality materials that quickly lose their properties when exposed to temperature and moisture. Cheap replacements for reputable products often contain asphalt instead of butyl, resulting in softening at high temperatures and an unpleasant odor.
Skipping the sound-absorbing layer (foam) and limiting yourself to butyl mats only. Comprehensive soundproofing requires both vibration dampening and sound absorption.
Tip: Before purchasing materials, it is worth checking their technical specifications, paying particular attention to the operating temperature range and chemical composition. Materials containing asphalt are not recommended for automotive applications.
Errors in surface preparation
Inaccurate preparation of the trunk surface can significantly reduce the effectiveness of soundproofing. Failure to properly degrease the surface leads to poor adhesion of adhesive materials. Even a small amount of grease or silicone can prevent the mats from sticking properly.
Installation of materials on damp surfaces not only results in poor adhesion, but also poses a risk of corrosion development under the insulation layer.
Skipping the step of assessing the condition of the surface and not removing existing corrosion. Soundproofing should be performed on healthy, undamaged sheet metal.
Improper installation
Even with the right materials and proper surface preparation, errors in installation can significantly reduce the effectiveness of soundproofing. Inaccurate pressing of the material, resulting in air bubbles under the mats. These bubbles not only reduce the effectiveness of soundproofing, but can also lead to material peeling off.
Improper joining of sheets of material, leaving gaps between them. These gaps are “acoustic bridges” through which noise penetrates.
Covering ventilation and drainage holes with soundproofing material. This can lead to the accumulation of moisture in the trunk and the development of corrosion.
Too thick a layer of soundproofing materials, preventing the subsequent installation of trim. Before applying, it is worth checking whether it will be possible to reinstall all the components after adding the insulation layer.
Neglecting the tailgate
A common mistake is to focus only on the trunk interior and overlook the tailgate. As a large, flat surface, the trunk lid is particularly susceptible to vibration and is a significant source of noise.
Soundproofing the trunk lid requires:
- Removal of the inner hatch cover
- Application of butyl mats to the metal surface
- Adding a layer of rubber foam
- Careful protection of the wiring and lock mechanisms
Keep in mind that the tailgate often contains complex mechanisms, such as the lock, actuators and lighting wiring. When soundproofing, you need to be very careful not to damage these components and interfere with their operation.
Summary
Effective soundproofing of a car’s trunk is a process that requires careful planning, selection of the right materials and thorough execution. Properly performed soundproofing has numerous benefits, from noise and vibration reduction, to improved audio system sound quality, to additional thermal insulation.
The key to success is the use of a two-layer insulation system, consisting of vibration-damping butyl mats and sound-absorbing rubber foams. These materials, available from ABM, are of high quality and durability, ensuring long-lasting soundproofing effectiveness.
The process of soundproofing the trunk, although it requires a certain amount of work and patience, is an investment that significantly increases the comfort of the car. Noise reduction is felt immediately after the work is completed, and additional thermal insulation adds value, especially during periods of extreme temperatures.
By avoiding the most common mistakes, such as improper selection of materials, inaccurate surface preparation or incorrect installation, you can achieve professional results even when performing soundproofing yourself. Keeping in mind all the described steps and tips, any driver can enjoy a quieter and more comfortable ride.
